Showing posts with label Recipes. Show all posts

Tuesday, March 6, 2012

C'mon Hallmark, Why No Happy Belated Pound Cake Day Card?

What's not to love about a recipe as simple as a pound of butter, a pound of sugar, a pound of eggs, and a pound of flour?  Different sources say that the pound cake was invented in the early 1800's because most people couldn't read recipes so it was an easy way to make a cake.  Even though I can read a recipe (which may be debatable if you see some of my screw ups) I love a poundcake, its something I make when I need to use up eggs or I don't want to make a trip to the store, so I was so happy to see that Pound Cake has its own holiday!!


National Pound Cake Day is officially March 4th, and I had every intention of posting this man-pleasing poundcake on Sunday night, but I was traveling through some icy weather and didn't arrive until entirely too late to start typing - unfortunately Hallmark doesn't make a "Happy Belated Pound Cake Day" card so please forgive me!  Since you get a ton of batter from this pound cake you can make a lot of different things from the batter.  Most people use a traditional bundt cake but for this recipe, I used two thirds of the batter to make 4 mini loaves of pound cake, and I poured the remaining one third of batter into a regular loaf pan to crumble up for the cake pops. 


This cake is a real man pleaser because it is really nice and dense, it looks like bread, it isn't sugary sweet and you can taste the bourbon, which is partly why I decided to make cake pops to give a girly spin to this manly cake. 



Bourbon Pecan Pound Cake
This recipe, slightly adapted from Food.com (and by slightly adapted, I doubled the Bourbon)

For the "His" Version
1 ½ cups butter, softened
1 - 8 ounce package cream cheese, softened (I used low-fat and
3 cups sugar
6 eggs
3 cups flour
½ teaspoon salt
½ cup Bourbon (I highly recommend Woodford Reserve)
1 ½ teaspoons vanilla
1 ½ cups pecans, toasted and chopped

Preheat oven to 325.  In the bowl of an electric mixer with the paddle attachment, on medium speed, cream together the sugar, cream cheese, and sugar, stopping to occasionally scrape down the sides until combined.  Turn the mixer on low and add the eggs one at a time.  Sift together the salt and the flour and add a cup of the flour mixture, followed by 1/4 cup of the bourbon, and then alternate until you add the last of the flour.  Stir in the vanilla and the pecans.  Prepare your pans by greasing and flouring them.  Divide 2/3rds of the batter among 4 mini laof pans and pour the remaining 1/3 into a normal sized bread pan or if you prefer more of a traditional pound cake, pour into a 12 cup bundt pan.  Bake for one hour, or until a toothpick comes out clean.  Let cakes cool completely on a rack.

For the "Hers" Version
Makes 16 cake pops

1/3 of the "His" Version Pound Cake, cooked, cooled, and dark edges trimmed off
1 can Cream Cheese Frosting, I used Duncan Hines
10oz White Candy Melts
1/2 cup Pecans, chopped
16 lollipop sticks

Shred the pound cake until it is the texture of sand, mix in the can of cream cheese frosting until a ball forms and it is the consistency of Play-Doh.  Wrap dough with plastic and chill for an hour.  Divide dough in half, then in half again, half again, and finally one last half again for 16 chunks of dough.  Roll each chunk into a ball. Then melt a handful of the candy melts and dip the lollipop stick into the candy melts, then stick it into the dough ball to secure it, work on a parchment covered cookie sheet so that you can stick all of the pops into the freezer when the sticks are inserted.  Leave in the freezer for 30 min to an hour for the pops to firm up.  Melt the rest of your candy melts, and dip your pops into the candy melts and top with the chopped pecans.

-Meg


Monday, March 5, 2012

Let's Celebrate National Cheese Doodle Day with Caramel Crunch Cheese Doodles!

Its National Cheese Doodle Day, and no other cheese doodle is closer to my heart than good ole crunchy Cheetos.  The spicy ones are awesome in a bloody mary, and if you have a bag getting stale, throw them in a food processor and they coat a piece of chicken pretty nicely.  I have to admit that I never thought of them as a good partner to a crunchy caramel coating until I stumbled across this recipe on food.com.  I was pretty sure this would go into the recipe fail folder, but the ingredients were cheap, and more importanly, already in my pantry, so I gave it a whirl and I am glad I did - the taste reminds me of those popcorn tins you get at christmas with the cheese and caramel popcorn inside - I LOVE to remove the divider and mix the cheese and caramel corn together and this is exactly what it tastes like.  I did mess around with the quantities of the original recipe a little because if a little caramel crunch is good a lot of caramel crunch is better! 


Caramel Crunch Cheese Doodles
slightly adapted from food.com

3/4 Cup  Unsalted Butter
3/4 Cup  Granulated Sugar
3/4 Cup  Light Brown Sugar
1/2 Cup  Clear Karo Syrup
1 tsp  Vanilla
1/4 tsp  Baking Soda
9 oz bag of Crunchy Cheetos

Prehear oven to 250.  Put the butter, sugars, and syrup in a 3qt saucepan over medium heat until the mixture comes to a boil.  Once the mixture comes to a boil, stir continously for 5 min and then remove from heat, stir in vanilla and baking soda until combined and add Cheetos to pan, stirring to coat.  Dump the gooey Cheetos mixture out on to a parchment lined cookie sheet spreading into a single layer and put into the oven for 60 minutes, stirring every 20.  Put the cookie sheet on a rack to cool and break into pieces when it is cool to the touch.

I cannot wait for the next movie night to debut this treat, and really who am I kidding, I'll probably sneak a bag of it into the theater to munch on at the Lorax...

-Meg


Tuesday, January 17, 2012

Chicken + Peanut Butter = Delish!

Update - If you liked this yummy curry soup, come join SoupaPalooza at TidyMom and Dine and Dish sponsored by KitchenAid, Red Star Yeast and Le Creuset for a whole stockpot full of great recipes!!

I have been craving the spicy food lately, even with the really warm winter we have been having, there is nothing better than a warm bowl of spicy soup on a winter day!  I went looking for a curry recipe that used the ingredients that I had in the cupboard already and I found this super easy one on delish.com.

Easy Peanut Butter Curry


Every time I read peanut butter and chicken together, in the same soup, I'm a little weirded out.  I mean you wouldn't have a chicken and peanut butter sandwich, right?  But this Peanut Butter Curry was super easy and fantastic!  For the original recipe, visit the link above, here is my adapted version that is a little spicier and includes more vegetables


  • 3/4 C smooth peanut butter


  • 2 C low-sodium chicken broth


  • 3 T madras curry paste


  • 1 can (13 2/3-ounce) unsweetened light coconut milk


  • 1 can (14 1/2-ounce) fire-roasted diced tomatoes (I used Muir Glen)


  • 2 boneless skinless chicken breasts


  • 1 pkg (8 ounce) sliced mushrooms


  • 1/2 C shredded carrots


  • Coat a pan with non stick spray and cook the chicken breasts, set chicken breasts aside and shred the chicken using two forks.  Using the same pan saute the mushrooms and carrots over medium heat until the carrots are soft. 

    In a large saucepan, whisk broth and curry paste. Heat over medium heat to boiling.  Whisk in coconut milk and peanut butter, and simmer for 2 to 3 minutes.  Stir in tomatoes, chicken, mushrooms, carrots and cook until heated through. Sprinkle with peanuts and serve with lime wedges, if desired.

    -Meg

    Sunday, January 15, 2012

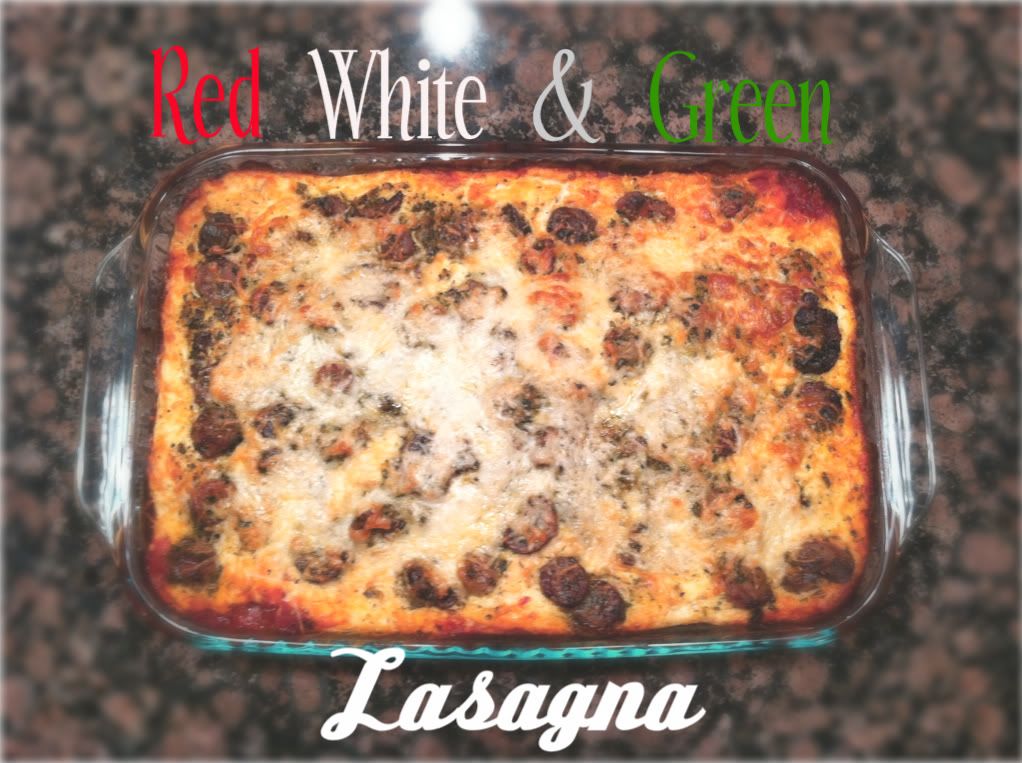
    Red, White, and Green Lasagna

    Sunday night is the night I go through the fridge making sure to throw away any expired salad dressings, make sure I'm not growing any science projects in the produce drawer, and check any meat that I hadn't had a chance to cook yet and see if I need to throw it in the freezer (I HATE wasting groceries when there are still hungry people - when they solve world hunger I will begin to waste with abandon...but until then) and as I was going through my weekly inventory, I had some marinara and pesto that I needed to use up, and some turkey sausage that was only a few days from expiring, so this multi-colored lasagna was born.


    Red, White, and Green Lasagna

    For the red layer:
    1 - 15 oz Marinara (I used Buitoni - but any marinara would do)
    8 - Oven Ready Lasagna Noodles

    For the white layer:
    2 - 15 oz Tubs of Fat Free Ricotta Cheese
    1/2 C Egg Beaters (or you can use 2 large eggs)
    2t Italian Seasoning
    1/2 C Shredded Parmesan Cheese
    1 3/4 C Shredded Italian 3 Cheese 2% Milk Blend (You could also use regular Italian Blend)

    For the green layer:
    1 - 7oz Reduced Fat Pesto (I used Buitoni - but any pesto would do)
    1 - 10oz Pkg Archer Farms Spinach Garlic Turkey Sausage, Sliced
    1 - 8oz Pkg Sliced Mushrooms
    Dash of salt
    non-stick cooking spray

    Topping:
    1/4 C Shredded Parmesan Cheese
    1 C Shredded Italian 3 Cheese 2% Milk Blend

    Preheat the oven to 375 degrees

    First assemble the green layer by spraying a skillet with non-stick spray and sprinkle with a dash of salt, putting the skillet on medium heat, add the mushrooms and cook for 5 minutes and then add the sliced sausage and cook until the mushrooms and sausage slices are browned.  Once browned, remove from heat and stir in the pesto, and set aside.

    Next assemble the white layer by mixing together the cheeses, egg, and italian seasoning in a medium bowl and set aside.

    Now you're ready to put the lasagna together, in a 9x13 baking dish put half of the marinara on the bottom of the pan, then place 4 of the lasagna noodles on top.  Then spread half of the white layer mixture on top of the noodles, followed by half of the green layer then 4 lasagna noodles.  Then to finish it off spread out the remaining half of the marinara on top of the noodles, then the remaining half of the white layer mixture and the last half of the green layer mixture layered on top. 

    Bake in a 375 degree oven for 60 minutes, sprinkle the topping cheeses on top and put back into the oven for 10 minutes.

    Reasons I like this lasagna:
    • Its easy to use light ingredients and you can't taste the difference
    • The only cooking involved was to brown the sausage and mushrooms
    • This lasagna has 8-10 servings, which means that I will cook once and have multiple meals already made
    • Lasagnas freeze beautifully - you can assemble it and freeze before or after baking
    • It was easy enough that I was able to watch the Golden Globes pre-show red carpet while assembling it
    I hope everyone had a great weekend!

    -Meg

    Thursday, January 12, 2012

    So You Think You Can Cook?

    Tonight, I was driving home (stomach growling), thinking about what I was going to make for dinner. Usually, my quick and easy go-to dinner in the winter is a little angel hair pasta with butter and grated cheese. There's nothing like easy, cheesy pasta to make all the insanity of your day melt away!

    However, after chatting with Meg today, I decided to change it up a little. We were talking about how since the start of the blog, we find ourselves cooking more and wanting to try new things. To stop making the same things over and over because we're too afraid (or lazy?) to go outside of our comfort zone. So, I ran with that thought.

    To add a little pizazz to my "lazy-man's dinner", I heated a tablespoon of olive oil in a pan, added a teaspoon of garlic, a teaspoon of basil and a pinch of salt and pepper. Once the noodles were finished cooking and drained, I tossed it in the mixture. Added some grated cheese and... VOILA! It was so much tastier than my usual noodles and cheese. It was EGG-CELLENT!

    (Please note that I was also watching Celebrity Cook-Off Rachael Ray vs. Guy Fieri. I don't know if it was the spirit of the show or my lack of 'experience' but I may as well have been a contestant. I'm jumping around the kitchen trying to make sure the garlic doesn't burn or that the noodles don't set too long. After all was cooked and eaten, I looked back and saw stuff laying everywhere. It was just so pathetic. If a camera was in the kitchen, you would've seen a crazed-hungry, jumping bean making a total mess... Just sayin'.)

    Now, I know this is nothing special BUT, I tried something different. Moved outside my comfort zone... on a week night at that! This is not the kind of thing I usually do. So, Bravo, Tina! Bravo!

    Until next time...

    ~Tina, the other egg

    Tuesday, January 10, 2012

    Lasagna - Turned Up A Notch!

    Almost every night, for at least half an hour, I'm in my kitchen watching my favorite cooking shows. The Barefoot Contessa, Cooking For Real with Sunny Anderson, Guy's Big Bite, Giada at Home (I know, I know, I have issues. I'm a Celebrity Chef Groupie *sigh*)... I sit there watching in awe, not only of their yummy-looking dishes but at how much fun they're having. The ease in which they create their dishes. Like it's the easiest thing to do... and they're there to show us how. But it just doesn't seem that way when I try to recreate the receipes. It seems like it's taking forever AND I make a massive mess of my kitchen.

    Then I have an epiphany: These people take hours making their dishes and then are edited to fit in a 30 minute segment AAAAAND don't have to clean up after themselves! UGH! Of course, they don't show you THAT on the show! Because I'm pretty sure if I had a "staff" to clean up after me, cooking would be so much easier and I would look just like them!

    For Christmas, my friend's mother gave me The Barefoot Contessa Family-Style Cookbook. I was so excited! I couldn't wait to try out a recipe. And finally did, this past Sunday. I was really craving comfort food so I decided to start out easy and try the Lasagna with Turkey Sausage. Now, I've been baking the same, super yummy lasagna for years. But, like Ina says "we're going to turn it up a notch!"...

    ...And so we did.

    First off, Ina says the lasagna takes 20 minutes to prepare. You know what I say? She lied. It took me a good hour to prep the whole lasagna. For crying out loud, it's a 3 step process! Noodles, meat sauce and cheesy mix! 20 minutes?? I. Don't. Think. So. Plus, my kitchen was a disaster area! It looked like a tornado had just finished blowing through!

    Second, I did make some changes to the ingredients to, let's say, fit more to my style. See my remarks in red below...
    • 2 tablespoons olive oil
    • 1 cup chopped yellow onion - 1 onion
    • 2 garlic cloves, minced (2 teaspoons minced garlic, from a jar)
    • 1 1/2 pounds sweet Italian turkey sausage, casings removed (1 Jimmy Dean Pork Sausage Roll)
    • 1 (28-ounce) can crushed tomatoes in tomato puree (crushed tomatoes IN puree? No, just crushed tomatoes!)
    • 1 (6-ounce) can tomato paste
    • 1/4 cup chopped fresh flat-leaf parsley, divided (1/4 cup dried parsley)
    • 1/2 cup chopped fresh basil leaves (1/2 cup dried basil leaves)
    • Kosher salt
    • Freshly ground black pepper
    • 1/2 pound lasagna noodles (8 lasagna noodles)
    • 15 ounces ricotta cheese
    • 3 to 4 ounces creamy goat cheese, crumbled
    • 1 cup grated Parmesan, plus 1/4 cup for sprinkling
    • 1 extra-large egg, lightly beaten
    • 1 pound fresh mozzarella, thinly sliced
    The fact of the matter is, I only have a chance to cook on the weekends. To constantly buy fresh herbs, when I already have the dried ones in my cupboard (and refrigerator), for two people to eat, seems ludicrous. I almost never use fresh herbs and my meals are just as tasty. Also, I don't care for turkey... Unless it's a big, fat bird in the middle of my table at Thanksgiving dinner.

    So, let me say this... I ♥ Ina Garten! I LOVE her recipes and will continue to recreate them. This lasagna was definitely a step up from the lasagna I'd been making. I think the thinly-sliced mozzarella was better than the shredded mozzarella I used to use. To me, it gave it a "thicker" taste. And the goat cheese? Why had I never thought to put that in my old recipe? I mean seriously, it gave it fabulous texture and taste! Much creamier with a little tang. I'll never go back! This is now MY recipe for lasagna going forward!


    And how great was it that my new Temp-tations Old-World Oven-to-Table Set came just in time? AWESOME!

    ~Tina

    Every Lazy Lady's Dream - Candy Bar Cookies

    Happy New Year!!  For those of you that have resolutions that include losing weight or eating less sugar, you'll want to go get back on the treadmill and just ignore this. 

    Ok, now that I have just "my people" here, Crisco's chosen ones, lets talk cookies - sometimes a girl just needs a plate full of cookies that look impressive and taste fantastic, but you don't have the time or energy to start on a recipe that begins with "Sift the first 12 dry ingredients together" then this is the cookie for you.  This isn't a recipe, this is simple assembly. 

    Candy Bar Cookies

    What You'll Need
    Premade Sugar Cookie Dough
    Snickers Mini Size Candy Bars

    Using your cookie scoop, scoop out the desired number of cookies so that you have uniform amounts of cookie dough. 

    Flatten the scoops into little round circles.

    Put a snickers mini in the middle of the dough, and seal the candy bar inside.

    Place on a cookie sheet and bake as directed, taking the cookies out a minute before suggested so they don't burn on the bottoms as you let them cool while they are on the pan instead of a rack because they are pretty delicate and fall apart when moved since their middles are all melted chocolate and nougat.


    If you are feeling particularly motivated you can decorate the tops of the cookies (Nothing says lazy lady like posting a pic of the Christmas tree cookies in January, now does it?!?)  To decorate the tops, I put a few green Wilton candy melts and a few red Wilton candy melts into freezer bags, put them in the microwave for 30 second intervals, stopping between to knead the melting candy until it was the right consistency to squirt out of a snipped off freezer bag corner and just freehanded the trees.  I think they would also be cute with white snowflakes on top for winter, red hearts piped on for Valentines, shamrocks for St Patrick's Day and so on.  (Where did I get the idea to pipe on decorations using a freezer bag with the corner snipped off?  Well Tina of course, she's brilliant if you haven't noticed!) 


    So, don't stop here with just the sugar cookie and snickers bars, come up with your own combos, such as peanut butter cookie dough with Reese's minis inside - there is no end to the flavor combinations and these cookies are so easy you will find yourself making them over and over and the best part, people ALWAYS compliment how yummy these cookies are!  Enjoy!

    -Meg


    Tuesday, January 3, 2012

    Meat & Potatoes, Please!!!

    My belly is so full! I cooked the tastiest roast and lets just say... I gorged! Yeah, I have a way of doing things like that. Over-indulging is my middle name!

    Last week I told my husband to pick up some "dinner meats" from the grocery store. What I got was a 2 lb eye of round roast. Now, since I'm fairly new to cooking (and loving every minute of it), I don't really know much about cuts of meat. Only that I like to eat them. I guess I should do some research. Anyway, in the end I did realize that it's a tougher cut but it didn't really matter... because it was TASTY!!!

    Look at it, isn't it beautiful?!!


    We'll call this Herb-Rubbed Eye of Round Roast with Red Potatoes and Onions :)
    
    Ingredients
    • 1 - 2 lb eye of round roast (or any other roasting meat)
    • 2 1/2 tsps kosher salt
    • 2 1/2 tsps paprika
    • 1 tsp garlic powder
    • 1/2 tsp black pepper
    • 1/2 tsp onion powder
    • 1/2 tsp cayenne pepper
    • 1/2 tsp dried oregano
    • 1/2 tsp dried thyme
    • 1/4 cup olive oil
    • 4 red potatoes, quartered
    • 1 yellow onion, quartered
    Directions

    In a small bowl, mix all of the spices and olive oil. Let sit for 10 minutes.

    Preheat the oven to 325 degrees F.

    Next you can prepare one of two ways... 1) Place in 13x9 baking dish, add potatoes and onions to surround the roast then pour spice mixture all over meat, then rub it in to make sure the whole cut is completely covered. Or - my personal favorite - 2) Prepare the same as number one BUT do so in an oven bag. I absolutely LOVE LOVE LOVE Reynold's Oven Bags! Not only do they not make your bakeware super messy but they also allow you to do whatever you want instead of standing at the oven constantly basting. That would drive me insane! I highly recommend Preparation #2.

    Roast for about 1 1/4 hours for a nice medium rare center. Remove from oven and cover with a little aluminum foil and let set for 15 minutes before slicing. (By the way, I don't slice... I leave that job to my husband!)

    So, if you're a meat and potatoes kind of person, then I highly recommend! The herb rub made both the meat and potatoes super flavorful!

    ~Tina

    Wednesday, December 28, 2011

    Trying to Cook Away a Cold

    Most people spend their after Christmas days shopping - I am so jealous of Tina's new planner and all of the other fab things she got at the after Christmas sales -I however, spend my after Christmas time trying to get over a cold almost every year.  I Purell, Zicam, and Airborne it up, but it doesn't seem to help - the only reason I can think of is that my husband wants to keep me from filling up our house with discounted holiday goods and secretly has every sick little kid lick my toothbrush in an effort to keep me away from the after holiday sales.  But I digress..

    To start to kick this silly cold, I first whipped up a variation of my mom's lemon and honey remedy.  whenever I got sick as a kid, my mom would take honey and lemon and microwave it until it was warm and let me tell you what - its so yummy it was almost worth getting sick!  As an adult I have doctored it up a bit and I won't claim that its a "cure" but it sure does make your throat feel better and you stop coughing for awhile. 

    Adult Lemon Honey Cold Remedy - make it as big or as small of a cup as you'd like
    1 part brewed green tea
    1 part lemon juice
    4 parts honey
    put in the microwave for ~30 seconds, then stir in 1 part Jack Daniels

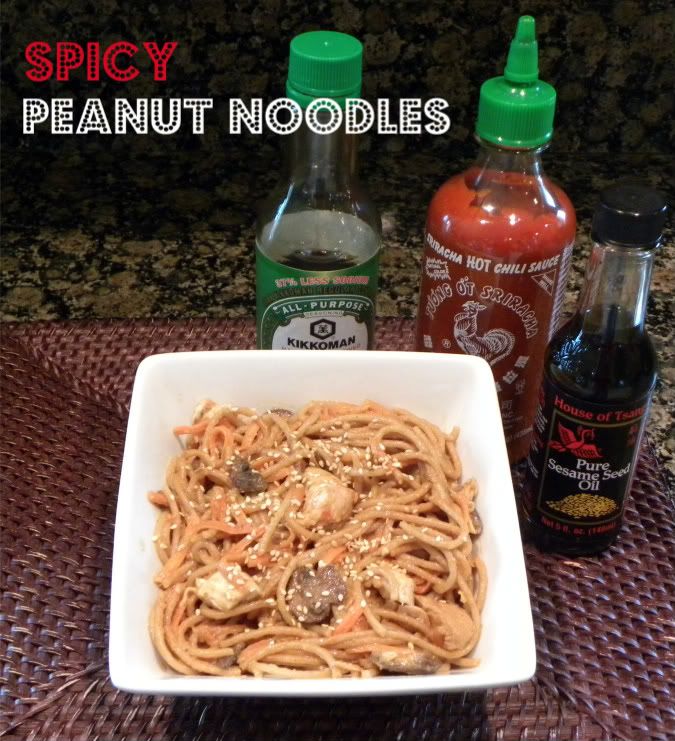
    I will say this did make me feel better for a little while, but then I started to feel congested so it was time to get out the big guns...SPICY FOOD!!  I had seen a recipe in Redbook a month or so ago that made spicy peanut noodles with good ole peanut butter - so using that as a base, I made a few variations to come up with my version of Spicy Peanut Noodles (click here to see the original Redbook recipe)


    To make Spicy Peanut Noodles you'll need:
    • 1 lb cooked spaghetti noodles (I used whole grain ones, but any would do)
    • 3/4 cup chunky peanut butter
    • 1/4 cup low-sodium soy sauce, plus a splash for cooking the mushrooms
    • 1/2 cup Siracha (you may want to use less - I was trying to kill a cold)
    • 1T garlic (I used the squeeze out of a tube kind - but minced cloves would work great too)
    • 1 cup shredded carrots
    • 1 cup cubed cooked chicken (I used the already cooked chicken breasts from Trader Joe's)
    • 1 pkg of sliced mushrooms (I used baby bellas, but any would do)
    • Sesame Seeds (optional)
    • Sesame oil (optional)
    In a wok or a large skillet, spray a little non-stick spray into the bottom of your pan and pour in the package of sliced mushrooms and a splash of soy sauce and let the mushrooms cook for 5 min and then add in the shredded carrots and chicken.  Then, in a small bowl, stir together peanut butter, soy sauce, siracha, garlic, and 1/3 cup warm water until smooth and pour into the wok along with the spaghetti and toss until combined.  Sprinkle sesame seeds and oil over each serving.

    Here's why I love Spicy Peanut Noodles - It was a large enough to feed the hubby and I for two very generous meals and a snack for me inbetween, you can vary the heat by adding or subtracting a little Siracha, it took longer to boil the water for the noodles than it did to stir everything together, and I could breathe through BOTH nostrils after I finished a bowl! 

    Next time you sniffle or you just need an easy throw together meal - give spicy noodles a try!

    -Meg

    Saturday, December 24, 2011

    Fantasy Fudge Facelift


    There's nothing better at Christmastime than good ole Fantasy Fudge, its printed on the back of the marshmallow fluff and chances are your Mom and her Mom before her have all made a pan of this holiday staple. (Why don't we make fudge for 4th of July I wonder?? We'll save that for a later post) Well this year, one type of fudge just wasn't enough - so with a little tweaking I have two new cousins for this old holiday standby. Peanut Butter Cup Fudge and Vanilla Caramel Fudge.  To get the original fantasy fudge recipe, go here.   This year I made the original recipe minus the walnuts, much like coconut and politics, walnuts have a definite polarizing effect on people, you're either very much so against OR in favor of them, i'm part of the against camp myself, but anyway, moving on to our facelift.

    Variation 1 - Peanut Butter Cup Fudge
    If you like Reese's - then this is the fudge for you!  Follow the fantasy fudge recipe just as suggested, but instead of chocolate, replace it with Wilton peanut butter flavored candy melts to make a delicious peanut butter fudge, and after you put it into the prepared pan while its still hot, sprinkle some choc chips on top and after they get soft from the warm fudge, drag your knife through the melted chocolate to swirl and TAH DAH, you have Peanut Butter Cup Fudge! 

    Variation 2 - Vanilla Caramel Fudge
    Once again, prepare the fantasy fudge recipe as suggested, but instead of chocolate, use vanilla flavored Wilton candy melts instead.  As you put the warm vanilla fudge into the prepared pan, smooth it out and then place dollops of caramel sauce (I used Archer Farms Caramel Sauce from the ice cream toppings section at Target) on top of the fudge and drag your knife through to make the swirls.  If you like caramel, then this is the fudge for you!  I will admit if I had to do this over I would have then crusted the top with dry roasted salted peanuts and it would have tasted EXACTLY like a salted nut roll!  So please, learn from my mistake and have some salted peanuts nearby! 

    This little package of fudge is going to our puppy groomer because she is just as sweet as this fudge! 

    I hope everyone is having a good Christmas Eve delivering goodies and well wishes to friends and family!

    Merry Christmas!


    -Meg

    Friday, December 2, 2011

    Cupcake Amateur: One Woman's Journey To Find (and Make) The Perfect Vanilla Frosting

    I had this great idea that cupcakes would be my "thing".  The one thing that I'd be really great at when it came to baking... maybe I spoke too soon.

    So, my latest invention was Cranberry Vanilla Cupcakes with Vanilla Frosting (OK, maybe it's not an invention but, I did come up with the idea without looking at a recipe book or perusing online... Kudos to me!) .  The Cranberry Vanilla part was easy but, the frosting?  Not so much.

    I had decided to start by making the frosting first because, if it came out a little too thin, I could set it in the refrigerator for a bit while baking the cupcakes.  Even though I "invented" the cupcake recipe, the Vanilla frosting recipe, I did not. I got one from a crappy bakebook I bought at Barnes & Noble on the bargain rack.  Mistake #1.

    Tell me what's wrong with this recipe's ingredients:

    3/4 cup unsalted butter, softened
    1 tsp vanilla extract
    2 1/2 cups confectioners' sugar

    See what I see? Where's the wet ingredients? No milk or heavy cream or even water... Ridiculous! And, of course, I didn't realize it until I'd already start mixing together. I tried adding milk but, in the end, it was too runny. Mistake #2.

    I finally decided to go with a tweaked version of a recipe I used on an earlier cupcake. However, at first, it wasn't so great. I had put it in the fridge to set but let it set too long. When I took it out and whipped it some, it was still too firm and turned out like this...


    My husband was walking through the kitchen while I was still fuming and said "Is that mashed potatoes?". As much as I tried to give him the evil-eye, there was no denying that it DID look like mashed potatoes and I ended up laughing hysterically!

    So, I ended up adding a little extra milk, warming it on the stove and just letting it set in the fridge for a few minutes. When I finally took it out, it was perfect!  I added it to a freezer storage bag, clipped the corner and piped the icing smoothly onto the cupcake.  You gotta love those storage bags :)


    Cake (makes 24 cupcakes):

    1 cup unsalted butter
    1 1/3 cups sugar
    6 large eggs, beaten
    3 cups flour
    3 tsp baking powder
    1/2 tsp salt
    1/2 cup milk
    1/2 cup sour cream (Tip: Sour cream is a GREAT add to all cupcake mixes. Makes them super moist!)
    2 tsp pure vanilla extract
    1/2 cup frozen cranberries, thawed and minced in food processor

    1.  Preheat oven to 350 degrees. Line cupcake tin with liners.
    2.  In a large bowl, whisk together the sugar, flour, baking powder and salt.
    3.  Next add your eggs, butter, vanilla and milk. Using a hand mixer (or Stand Mixer, if you're lucky enough to have one. GRRR I do not... yet!), beat on medium speed until well blended.
    4.  In a food processor, pulse your cranberries until minced. Add to cupcake batter and mix together evenly.
    5.  Pour batter into cupcake liners until half full. (Tip: Put the batter into a large freezer storage bag and cut the corner tip. Piping the mixture into the liners is way less messy!)
    6.  Bake cupcakes for 20 minutes, or until a toothpick comes out clean.

    Vanilla Frosting:

    1 1/2 cups sugar
    1/4 cup all-purpose flour
    1 1/2 cups milk
    1/4 cup heavy cream
    1 1/2 cups (3 sticks) unsalted butter, cut into small pieces
    1 tsp pure vanilla extract

    1.  In a medium saucepan, whisk the sugar and flour together. Add the milk and heavy cream and cook over medium heat, whisking occasionally until the mixture comes to a boil and has thickened, about 20 minutes.
    2.  Transfer mixture to a large bowl and beat on high speed until cool. Add the butter and beat until completely blended. Add the vanilla and continue mixing until all is well combined. If the frosting is too thin, set in the refrigerator for a few minutes to set. If it's too thick, cook on stove on medium heat, add a little bit of milk and continue stirring until you reach a smooth consistency.

    Happy Baking
    ~Tina

    Tuesday, November 29, 2011

    More than a couple of good eggs...

    I thought it would be fitting if my first "official" post was egg related and by pure coincidence I just happened to make the world's easiest, pleaseyist (yes, I know its not a word, but I am a sucker for rhyming) mini egg casseroles.


    Easy Peasy Egg Casseroles
    What you'll need:
    3 cups of Egg Beaters
    1 cup of Shredded 2% Milk Sharp Cheddar
    1 6oz Package of Canadian Bacon
    Non-Stick Cooking Spray
    Jumbo Muffin Tin


    Preheat oven to 350 degrees
    Spray muffin tin with non-stick spray. Measure 1/2 cup of Egg Beaters and pour into each cavity of the jumbo muffin tin. Finely chop your Canadian Bacon and roughly divide into 6 and sprinkle into each cavity full of egg. Follow with your shredded cheese and divide into 6 and sprinkle on the top of each "egg muffin". Tap the muffin tin on the counter a couple times to help the ingredients settle, and then you're ready to bake!
    Pop the muffin tin into the oven and set your timer for 30 minutes. If you like your eggs a little less firm, go 20 minutes. While they are baking it looks like they are blowing up and are going to all meld into one giant mess, but don't worry, they de-puff when you take them out of the oven.
    When they are all done, put them on a serving plate and let each person build their own flavors by setting out salsa, green onions, tomatoes, more cheese, diced bell pepper, and any other toppings that you enjoy with eggs.
    Here's the reasons why I love this simple recipe SO much:

    • Each muffin is ~150 calories
    • You can freeze and reheat - I make these in all different flavors on the weekend, pop them into individual zip top bags and I have a microwaveable breakfast to go for the workweek.
    • You can mix it up by using bacon and spinach, sausage and pepperjack or whatever tastes suit you
    • If you're serving brunch to a crowd you can make them ahead and keep them warm in the crock pot on low.
    Hope you have an eggscelent day!
    -Meg

     
    Site Design by Designer Blogs